Looking for purpose or out of sheer boredom, about a decade ago I decided to try and run a marathon. After 5+ hours and 26 miles of sweat and tears I was able to drag my body thru the finish line. So I got my shiny finisher medal, and when I was leaving and about to throw it to the trash swearing that I will never do this again, I though… well I survived 1 marathon in 5 hours, perhaps I can run another in less time…so what the hell, let’s try another one. That was the beginning of my love-hate relationship with long distance running and the dawn of this life long quest to collect 100 marathon finisher medals. Here I have decided to document this journey – perhaps in the future, some alien species will find these bits of information while digging thru the dust of an extinct earth – and find this digital capsule to be useful. By the way, if I fall dead of a stroke in a race, let this be my final words: “That’s all folks!”.
68/100
11/11/2020: The count stands at 26 with 2 more coming by the of November.
12/29/2020: The end of the year is getting close with the last two medals of the lot (#27,28): Richmond marathon and Raleigh city of Oaks. Next year will post images of every race (I now regret not purchasing photos of the previous races 😦 ).
Richmond and Raleigh City of oaks: #27 and 28.
2.0.2.1.
2/13/2021 (#29) Run Oak Island Marathon: Very though day, it rained all weekend and it was cold (32 degree rain all day long!). Finished in 4:01 hr. (no photos in this one 😦 )
Super cool medal shape!
2/27/2021 (#30) Ellerbe NC Marathon
Arguably the hardest race I’ve ever done. Lots of hills, an interminable 26 mile roller-coaster, my legs were shut. Disappointed @ 4:20hr.
Finisher medal.
Start of the race.
First loop after mile 13.
3/12/2021 (#31) Sports Backers Marathon: In the picturesque Capital Trail in Henrico VA.
Started like a tiger… finished like a wimp in 4:51 hr. Perhaps I shouldn’t have driven 2 1/2 hr from Raleigh on race day plus, the lack of Gatorade/nutrition left me screwed after mile 18 😦
4/10/2021 (#32) Charlottesville Marathon: In the beautiful Smokey mountains in VA.
This one has to be one the hardest races in the east coast! At the start line there was the slogan “Bad to the bone…” and when I read that I knew it was gonna be a long day 😦 Finished in 3:56 which is not bad for such a hilly-gravelly 26 mile track.
4/17/2021 (#33) Wilmington NC Marathon: My little mountain of medals keeps growing at a steady pace. This one was in the crown jewel of the North Carolina coast!
Was pleasantly surprised at how nice the town of Wilmington is – As a matter of fact, heard that it is called the Hollywood of the east coast, and after the race I understood why. It was a flat-fast track and even so I did a disappointing 4:19 (for some reason I run faster in roller coaster tracks than flat ones).
5/15/2021 (#34) Tobacco Road Marathon: In beautiful Cary NC a few blocks away from my home. A flat fast course in a warm sunny day at the start of the summer. It was surprisingly cool for a summer day. Finished in a decent 3:52 – if not for the cramping in the last half mile it could have been faster (No photos in this one due to the pandemic – incidentally the mask mandate was removed two days prior).
Tobacco Road Marathon super sweet finisher medal.
10/02/2021 (#35) Cary Green ways Tour Marathon: The end of the year is closing in and a really tough sequence of races is about to start: 4 marathons with only 1 week recovery: October – Cannon ball, Run RDC – November Raleigh City of Oaks and finally Richmond marathon. I hope I can get thru this without falling dead from a stroke, but if that happens, I’ll go doing what i love the most. All in all this race was in the beautiful Cary NC green ways starting at Bond Park; an incredible day with perfect temperatures, breath taking scenery, inspiring sunshine in picturesque Cary. An incredible day in a super flat track. Finished in a decent 3:48 even though I cramped really bad in the last mile – incidentally my Bib number was 348!
Cary Green ways Tour: Bib 348 – finished in 3:48 Haha!
10/31/2021 (#37) Run RDC in Raleigh: A flat and boring marathon track in the South point mall in Durham. The course is so flat and straight that I always accelerate too much to the point where I burn myself out in the last few miles. The weather was beautiful though and so is the tobacco trail in Durham. Another week to recover with a ton of electro-massage, then to the City of Oaks!
Run RDC medal and finisher certificate.
10/31/2021 (#38) Raleigh City of Oaks marathon, the crown jewel of the city of Raleigh. This year the course changed significantly. I had fun with my sister chasing me around the course in an electric bike. Finished in 4:03, an improvement of previous years by ~ 10 min.
City of Oaks medal and finisher certificate.
11/13/2021 (#39) Richmond Marathon, the friendliest race in Virginia @ https://www.richmondmarathon.org/. This is the last race of the season after a grueling sequence of 4 marathons with 1 week recovery. I don’t know how I did it, but this is the last time I try this. Surprisingly good time @ 3:59 after a fire and brimstone month of races. Glad it is all over, and looking forward to next year. The quest continues!
Incidentally, the pandemic and supply chain problems prevented organizers from delivering medals at the finish. I should get my medal soon by mail.
02/26/2022 (#41) Wilmington marathon: Just one week after oak island, comes the second race of the season in the super quaint city of Wilmington NC. Finished in a surprising fast time of 3:55:31
Medal plus dragging myself across the finish wishing I was dead of cramps and pain.
04/09/2022 (#43) Charlottesville Marathon, the last race of the spring season in the super nice town of Charlottesville Virginia. The medal count is getting close to 50….Wow!
04/23/2022 (#44) Run for Malawi Marathon: A last minute entry at the end of the spring. I overestimated the brutality of the course, the heat and the poor hydration offered by the organizers – no gatorade, no energy gels, just a couple of gallons of water and some tangerines on a 18 loop 1.4 mile circle with a very steep climb. I was horrible, and unfortunately I began urinating blood past mile 20 and had to withdraw to run to the urgent care in Chapel Hill. Fortunately after a blood test and a ton of gatorade, it cleared up. A close call that reminds me this stuff can be very dangerous without proper preparation. This is the first race I had to withdraw of the 44 and the last I plan to, next time I will be ready.
LAST FOUR OF THE SEASON: The end of the year is here, with the last 4 races of 2022. This will probably be the last year that I run 8 marathons in a single year. I am getting too old and this is getting too hard. Time to recover, lick my wounds, and get ready for next years season.
Last four of the 24 fall season (at last). Always thought that I will take my last breath doing what I loved “a 26 mile marathon”, however I am getting old, this is getting harder every time. – this ain’t fun anymore 😦 –
Five more to the list (68). Every year is getting harder and harder, and still have a long ways to go. (Don’t feel like posting photos… I am just too tired of doing this) 😦
2.0.2.6
THIS STUFF WILL BE UNDER CONSTRUCTION FOR THE NEXT DECADE OR SO…
The race id described by the organizers as “Complete 1063 Miles across the eastern portion of the United States from the Coast of Sunset Beach NC to the Arkansas/Oklahoma State line. This registration will include the Eastern Race Medal +1 United We Run Tech Quarter Zip. Option 2 will also include the ability to log you’re miles via our official dashboard and view yourself on our interactive map”. Anyway, I decided to try it to earn that super-kool monster 14 inch medal.
11/28/2020: I am currently around 5% of the total distance, it’ll probably take me around 3 months of 1-15 miles a day to complete it which is perfect as I am running all the time to collect my 100 marathon finisher medals, my ultimate dream.
03/12/2021: With a combination of intensive cycling, running and swimming I was able to complete this challenge an got my shiny East coast medal!
Finisher certificate for the East!About to reach 100% of the distance!
2.0.2.1
10/17/2021: So I finished the run the east challenge, now decided to go for the run the west to complete the collection. I am at around 47% of the total distance and soon will have my two new shining medals that show that I have run-cycled-swam virtually across the US!
Kubernetes is one of the coolest open software projects to pop out in a long time. But it is also mighty though to install and use. The K8S community (K8S being the acronym for Kubernetes) has tried to make things easier by creating a bunch of system administration and configuration tools such as kubeadm and kubeconfig. But still, installing a real kubernetes cluster is not for the faint of heart. So much so that in my first brush with k8s few years ago trying to install it in a single node I quickly gave up after being overwhelmed by the complexity of the installation. A few years later with more experience and resolve at hand, I present thee in this post a simple shell script I created when setting up a 7 node internal cluster in my organization.
K8S: The perfect app-sitter for your Inter-webs
So why is Kubernetes so cool? You need to start using it to realize all the great things it can do for you. Here is just a small list that comes to mind:
It manages the life-cycle of your app: It is the perfect app-sitter! It can install, configure, load balance and make sure your app is always up and running. Only this is worth the price of admission.
It can orchestrate all facets of scalability: Kubernetes is a cloud clustering orchestrator. It takes care of clustering-load-balancing your workloads big or small. And it does this automatically for you (configure and forget). If you can get past the complexity of the installation of course.
No wonder why Kubernetes was originally dubbed project “Borg” by Google , its original developer.
Resistance is Futile: You will be assimilated
After I finally got it running and began playing with it. I
understood why Google dubbed Kubernetes project “Borg”. In Star Trek, the Borg
is a black hole of technology. It absorbs everything in its path and takes no
prisoners. Google was definitely thinking big when they came up with this
project; lucky for us , they decided to open source it so that we all can
benefit from its power.
Recently I was tasked with setting up a real 7 node cluster in my organization using CentOS7 VMs. The steps are though, even for the seasoned system administrator. My background is in software engineering not system administration so it was harder for me, nevertheless I loved the challenge.
Here is an overview of the steps to manually setup 1 node which I found online:
Disable SElinux: Security Enhanced Linux and Kubernetes don’t get along and therefore it is highly recommended that you disable it. This is easy and can be done with a single command: setenforce 0 (If you want the changes to be permanent, for example on node restart, then you must edit the file /etc/sysconfig/selinux).
Disable Swap: In Linux, swap is a virtual memory file, when things become stale in RAM or it becomes full, the kernel may decide to move stuff to virtual memory (swap). That’s where things get hairy for Kubernetes. I am not exactly sure of the real reason for this but the official one is: performance and that all processes should be pinned with CPU/memory limits.
Install Docker: Docker is another great piece of software to come out of the cloud open source community. Right now Docker and Kubernetes are joined by the heap. Kubernetes uses Docker as it’s the container runtime (a container is the backbone that runs you app). Although Kubernetes claims to support multiple container runtimes, Docker rules the container space for now, and this situation is unlikely to change anytime soon.
Create a K8S repo: CentOS7 as well as many other Linux distros focus on stability rather than latest features. Therefore, K8S being a relatively new comer, is missing from the official package distribution repos. It must be added manually.
Still not overwhelmed yet? The next step is to install the Kubernetes packages. Lucky for us Linux packs the most incredible package manager that makes installing software a breeze: YUM (YellowDog Update Manager), a most excellent software tool!
We are finally getting to the light at the end of the tunnel. In this step, the kubelet service must be enabled. Kubelet is the service that manages all the Kubernetes daemons.
The final step is to start the kubelet service and configure the cluster.
This is a lot of steps just to install in a single node, now imagine doing this in 7 nodes in our internal cluster. No way! All this can be automated in a single script as shown in listing 1.
#####################################################################################
# General purpose kubernetes install/setup script for CentOS7
# https://www.techrepublic.com/article/how-to-install-a-kubernetes-cluster-on-centos-7/
# https://github.com/kubernetes/kubernetes/issues/53333
# https://kubernetes.io/docs/setup/independent/create-cluster-kubeadm/
#####################################################################################

# Install in the master (API server)
if [ $1 == "install" ] ; then
 echo "Selinux changes..."
 setenforce 0
 sed -i --follow-symlinks 's/SELINUX=enforcing/SELINUX=disabled/g' /etc/sysconfig/selinux

 if [ $? -ne 0 ] ; then echo "Failed to disable Selinux" ; exit 1 ; fi

 # 1. disable swap
 swapoff -a
 if [ $? -ne 0 ] ; then echo "Failed to disable swap" ; exit 1 ; fi

 # 2. "*do* send the packets to iptables
 # (see config) modprobe br_netfilter
 # manually: echo '1' > /proc/sys/net/bridge/bridge-nf-call-iptables
 sysctl net.bridge.bridge-nf-call-iptables=1

 if [ $? -ne 0 ] ; then echo "Failed configure iptables" ; exit 1 ; fi

 # 3. Install docker
 echo "Installing docker..."
 yum install -y -q docker-io

 # 4. create k8s repo
 echo "Creating a k8s repo @ /etc/yum.repos.d/kuberetes.repo"
 cat <<EOF >> /etc/yum.repos.d/kuberetes.repo
[kubernetes]
name=Kubernetes
baseurl=https://packages.cloud.google.com/yum/repos/kubernetes-el7-x86_64
enabled=1
gpgcheck=1
repo_gpgcheck=1
gpgkey=https://packages.cloud.google.com/yum/doc/yum-key.gpg
        https://packages.cloud.google.com/yum/doc/rpm-package-key.gpg
EOF

 # 5. install kubernetes
 echo "Installing k8s..."
 yum install -y -q kubelet kubeadm kubectl

 # 6. enable service
 echo "Enabling kubelet service..."
 systemctl enable kubelet.service


 # 7. start service
 echo "Restarting systemd daemon"
 systemctl daemon-reload
 systemctl restart kubelet
fi

# get host IP adddress
addr=`hostname --ip-address`

# Initialize the container network (done in the API server only)
# https://coreos.com/flannel/docs/latest/
if [ $1 == "initflannel" ] ; then
 #Initialize the Kubernetes cluster
 echo "Configuring API server with IP $addr Flannel network"
 kubeadm init --apiserver-advertise-address=$addr --pod-network-cidr=10.244.0.0/16

 # for  connection to the server localhost:8080 was refusedhttps://github.com/kubernetes/kubernetes/issues/50295
 cp /etc/kubernetes/admin.conf $HOME/
 export KUBECONFIG=$HOME/admin.conf
 echo "export KUBECONFIG=$HOME/admin.conf" >> $HOME/.bashrc
 kubectl --namespace="kube-system" get all

fi

# Another popular network: https://www.projectcalico.org/
if [ $1 == "initcalico" ] ; then
 #Initialize the Kubernetes cluster
 echo "Configuring API server with IP $addr CALICO network"
 kubeadm init --apiserver-advertise-address=$addr --pod-network-cidr=192.168.0.0/16

 # Setup config: for  connection to the server localhost:8080 was refused
 # https://github.com/kubernetes/kubernetes/issues/50295
 cp /etc/kubernetes/admin.conf $HOME/
 export KUBECONFIG=$HOME/admin.conf
 echo "export KUBECONFIG=$HOME/admin.conf" >> $HOME/.bashrc
 kubectl --namespace="kube-system" get all

fi

# Install network (pick one only flannel or calico) API server only
if [ $1 == "flannel" ] ; then
  kubectl apply -f https://raw.githubusercontent.com/coreos/flannel/master/Documentation/kube-flannel.yml
fi

if [ $1 == "calico" ] ; then
  kubectl apply -f https://docs.projectcalico.org/v3.1/getting-started/kubernetes/installation/hosted/rbac-kdd.yaml
fi

# For a slave node only (generate a join token)
# kubeadm token generate
# kubeadm token create <generated-token> --print-join-command --ttl=0
# https://stackoverflow.com/questions/40009831/cant-find-kubeadm-token-after-initializing-master
if [ $1 == "join" ] ; then
  master=$2
  TOKEN=$3
  DISCOVERY_TOKEN=$4
  echo "Joinig master $master token $TOKEN Discovery Token $DISCOVERY_TOKEN"
  kubeadm join $master:6443 --token $TOKEN --discovery-token-ca-cert-hash $DISCOVERY_TOKEN
fi
Listing 1: Shell script to automate the installation and configuration of Kubernetes in CentOS7.
After Install – Get ready to Configure
The script in listing 1 is capable of not only installing but configuring your cluster. In Kuberenetes lingo, the cluster master is called API Server. Thus from my 7 allocated nodes, I picked one to be the API server and 6 to be the work horses (slaves).
Take a look at the script. You will notice that it supports a few runtime commands:
Install: This parameter installs the software only and it must be run in all 7 nodes. Note that the cluster must be initialized using the kubeadm tool.
Initflannel: This parameter initializes the cluster with the flannel virtual network that gives a subnet to each host for use with container runtimes.
The first line above installs all the stuff. The second initializes the API Server with the Flannel network and the third deploys it. That’s it! Now before we join the 6 nodes to the cluster we need a join and a discovery tokens. So run the following commands in the API Server:
The first line installs Kubernetes on the slave, and the second joins the node to the cluster. Also, master-ip-address is the IP of the API Server. This is equivalent to using the kubeadm command:
Keep in mind that you will need system administrator (root) access to run the commands above. All in all, this simple script was a life saver for me. I originally spent around 4 hours manually setting up a single API Server; however, after running the script multiple times, I was able to quickly create many internal 3-node Kubernetes clusters under 10 minutes. I hope it can make your life easier too!
So we have a tough problem at my organization: We have a
pretty cool web app that is modularized, reusable, clean and capable of
connecting clients with a server side telephony system. I work for a
telecommunications company and our job is to provide agents with access to
their own call manager system via a web browser soft-phone among others.
Our app looks good and works great with a relative low number of agents (clients); however when the number of agents creeps up to 50-100 and above it crashes and burns. At this point our customer support team starts getting calls from angry customers telling us that our app works like crap and finally I get to face the brunt of that anger as part of the development team. Our ultimate goal is to have a server side app that can handle unlimited numbers of agents. For this purpose we looked at several solutions:
Clustering via in-memory caching: Platforms like Hazelcast, memcached, etcd provide distributed data structures like Maps, Lists, Queues, etc, that can be used to share state across multiple nodes. A solution like this sounds good in theory but is hard to implement, especially in small teams with tiny budgets such as ours.
Connection Pooling: Very similar to the way an enterprise application server like IBM’s Websphere or Oracle’s Weblogic does with data bases. I began thinking about this and wondered if a simple connection pooling system could be created to track client side connections to a Call Manager system (such as Avaya or Cisco). Our server side app runs on the Apache Tomcat App-Server.
In this post I discuss the hoops I went through to create a simple-reusable connection pooling system which we use to connect our server web-app to a remote call manager system such Avaya Application Enablement Services (AES) or Cisco Call Manager. So our web app is essentially a server side daemon that packs a simple JTAPI (Java telephony Interface) client that connects to a Call management system (for this post I will use Avaya AES – however any call manager will do).
Why I didn’t use Commons-Pool or Similar Libraries
There are open source libraries out there that provide Object pooling capabilities such as Apache’s Commons Pool, nonetheless I felt apprehensive about using them for the following reasons:
Bulkiness: Most libraries tend to be bulky and use external dependencies. This is not a desirable treat. We wanted something simple that we can control.
Open Source Control: Ideally we wanted full control over the source code. This is certainly possible with a library such as Commons Pool, but it tends to be complex with a steep learning curve if you wish to change it; not to mention that Apache Commons libraries tend to depend in other Commons libraries.
Thus the perfect library for us needed the following treats:
Simplicity and small foot print: The code in this post is less than 500 lines and will do the job.
Re-usability: Our web app supports many vendors. Thus our connection pooling mechanism must be reusable by multiple vendor implementations. This can be easily achieved by using interfaces and the power of reflection in the java language.
Our connection pooling mechanism consists of a simple interface and a server façade. Let’s take a closer look.
A
Simple Connection Pooling Interface
Listing 1 shows the simple interface IConnection for any socket based client that is to be pooled:
The life-cycle is controlled by the methods: connect, disconnect and getStatus
Additionally, the status of the connection can be queried via the ConnectionStatus class which provides a status value and a description (helpful to store connection messages, errors, I/O timeouts, and others. The life-cycle is controlled by the methods: connect, disconnect and getStatus
package com.c1as.net;

import java.io.IOException;

/**
 * Classes that are pooled must implement this class.
 */
public interface IConnection {

  /** Connection status */
  public enum Status {IDLE, CONNECTED, DISCONNECTED, UNKNOWN, ERROR};

  /**
   * Used to keep track of the status of a connection.
   */
  static class ConnectionStatus {
    private Status status;
    private String description;

    public ConnectionStatus(Status status, String description) {
      super();
      this.status = status;
      this.description = description;
    }

    public Status getStatus() {
      return status;
    }

    public String getDescription() {
      return description;
    }
    public void setStatus (Status status, String description) {
      this.status = status;
      this.description = description;
    }
    @Override
    public String toString() {
      return status + ":" + description;
    }
  }


  /**
   * Connect.
   * @param waitForConnection If true wait for the connection to succeed.
   * @throws ConnectionPoolException
   */
  public void connect (final boolean waitForConnection) throws IOException;

  /**
   * Disconnect.
   * @throws ConnectionPoolException
   */
  public void disconnect() throws IOException;

  /**
   * Get connection status.
   * @return See {@link ConnectionStatus}.
   */
  public ConnectionStatus getStatus ();
}
Listing 1: Connection Pool interface.
Any socket based client that wishes to be pulled must implement IConnection. All connections in turn are managed by the pool facade in the next section.
The Connection Pooling Facade
A facade called ConnectionPool (see listing 2) is the entry point to all pooling operations. Its job is to:
Track all connections using a hash map where the key is a connection ID of the form PREFIX-INDEX. Where PREFIX is a user defined name for the connection(s) and INDEX is a unique connection number: 0,1,2,…
Track clients requesting connections. This is used to spread connection usage in a round robin fashion. For example client-0 will use connection CONNECTION-0, client-1 will use connection CONNECTION-1 and so forth. By spreading usage this manner, the inner socket traffic is distributed evenly among all connections thus improving overall I/O throughput. This is our main goal: unlimited client support!
Load IConnections dynamically using reflection. This provides for re-usability: any type of client socket based client can be implemented. In our organization we use it to provide pooling to multiple call management systems such as Avaya AES, Cisco CM, and others.
Bonus: There is an auto-grow feature which increases the number of connections in the pool on demand once the client tracker list fills up to a configurable threshold. This is a neat feature that automatically manages the size of the pool when traffic increases. Sort of a turn on and forget piece (this ought to make your system administrator happy).
Initialize the pool: By providing an initial pool size, a connection name prefix (used as part of the key in the connection tracker hash-map), the class name that implements IConnection, an auto-grow Boolean value, and a threshold used to dynamically grow the pool once the number of clients reaches this value.
package com.c1as.net;

import java.io.IOException;
import java.util.ArrayList;
import java.util.HashMap;
import java.util.List;
import java.util.Map;
import java.util.Map.Entry;

/**
 * Simple-reusable connection pooling for your webapp.
 * <ul>
 * <li> Loads connections that implement IConnection via reflection.
 * <li> Tracks clients and grows on demand when clients exceed a configured threshold.
 * </ul>
 * @author VSilva
 *
 */
public class ConnectionPool {

  // Initialization Options
  /** min  # of connections to start @ boot time */
  public static final String OPT_MIN_CONNECTIONS      = "OPT_MIN_CONNECTIONS";

  /** Class name that implements IConnnection (loaded via reflection */
  public static final String OPT_CN_CLASSNAME       = "OPT_CN_CLASSNAME";

  /** max # of clients/connection before autogrowing the pool (add more connections */
  public static final String OPT_MAX_CLIENTS_BEFORE_GROW  = "OPT_MAX_CLIENTS_BEFORE_GROW";

  // Holds pool of connections
  private static final Map<String, IConnection> connections = new HashMap<String, IConnection>();

  // clients for each connection above
  private static final Map<String, List<String>> clients = new HashMap<String, List<String>>();

  // Min # of cns in the map above
  private static int minConnections       = 5;

  // Auto grow? Add connections on demand?
  private static boolean AUTOGROW       = true;

  //Max # of clients before grow
  private static int maxClientsBeforeGrow   = 10;

  // connection prefix
  private static String cnPrefix        = "CONNECTION";

  // IConnection class to load via reflectionn
  private static String cnClassName     = null;

  // poinetr to the current pool connection
  private static int poolIndex;

  private ConnectionPool() {
  }

  /**
   * Initialize the connection pool with the options above.
   * @param options Map of options (see above)
   * @return The time in ms that akes to start.
   */
  public static long start(Map<String, String> options) throws IOException {
    if ( options.containsKey(OPT_MIN_CONNECTIONS)) {
      minConnections = Integer.valueOf(options.get(OPT_MIN_CONNECTIONS));
    }
    if ( options.containsKey(OPT_MAX_CLIENTS_BEFORE_GROW)) {
      maxClientsBeforeGrow = Integer.valueOf(options.get(OPT_MAX_CLIENTS_BEFORE_GROW));
    }
    if ( ! options.containsKey(OPT_CN_CLASSNAME)) {
      throw new IOException("A class name that implements IConnection is required (OPT_CN_CLASSNAME)");
    }
    cnClassName = options.get(OPT_CN_CLASSNAME);
    return initializePool();
  }

  /*
   * Load a ICoonection class via reflection
   */
  static IConnection loadConnectionClass () throws IOException {
    IConnection cn = null;
    try {
      final Class<?> obj  = Class.forName(cnClassName);
      cn          = (IConnection)obj.newInstance();
    } catch (Exception e) {
      throw new IOException(e);
    }
    return cn;
  }

  /**
   * Private initializer.
   * @return The time in ms that takes to initialize all connections.
   */
  private static long initializePool () throws IOException {
    long t0 = System.currentTimeMillis();
    // Init-load N IConnections via reflection
    for (int i = 0; i < minConnections; i++) {
      initializeConnection(i, false);
    }
    return System.currentTimeMillis() - t0;
  }

  /**
   * Load the ICoonection via reflection & save it in the local Map.
   * @param index A connection index used to derive a Map key.
   * @param waitForConnection If true wait for the connection to coonect.
   */
  private static void initializeConnection (final int index, final boolean waitForConnection) throws IOException {
    IConnection cn = loadConnectionClass();
    try {
      cn.connect(waitForConnection);
    } catch (IOException e) {
      //e.printStackTrace();
    }
    // save it & init clients HM
    addConnection(index, cn);
  }

  // Save the connection in the local Map. The key is derived from a PREFIX-INDEX.
  private static void addConnection (int index, IConnection cn) {
    final String key = cnPrefix + "-" + index;
    connections.put(key, cn);
    clients.put(key, new ArrayList<String>());
  }

  /**
   * Shutdown the pool. Close connections.
   * @return The time (ms) that take to shutdown.
   */
  public static long destroy () {
    long t0 = System.currentTimeMillis();
    for ( Map.Entry<String, IConnection> entry : connections.entrySet()) {
      IConnection conn =  entry.getValue();
      try {
        conn.disconnect();
      } catch (IOException e) {
        e.printStackTrace();
      }
    }
    connections.clear();
    return System.currentTimeMillis() - t0;
  }

  /**
   * Restart after some config change.
   * @param options An options map (see top options)
   * @return Restarts time (ms).
   * @throws ConnectionPoolException If there is a connection failure or reflection error.
   */
  public static long restart(Map<String, String> options) throws IOException {
    long t0 = destroy();
    long t1 = start(options);
    return t0 + t1;
  }

  private static String getCurrentId () {
    return cnPrefix + "-" + poolIndex;
  }

  /**
   * Get a connection for use.
   * @param clientId An Id of the client that will use the connection (client IDs are used to grow the pool on demand).
   * @return An object that implements {@link IConnection}
   * @throws IOException On connection failures, reflection errors, etc.
   */
  public static IConnection getConnection (final String clientId) throws IOException {
    if ( AUTOGROW ) {
      String lowestKey = autogrow();
      // point to the lowest idx
      poolIndex = Integer.parseInt(lowestKey.split("-")[1]);
    }
    // Create and/or Load balance
    final String key  = getCurrentId();
    IConnection cn    = connections.get(key);
    int size      = connections.size();

    // check cn status
    if ( cn.getStatus().getStatus() != IConnection.Status.CONNECTED) {
      throw new IOException(key + " " + cn.getStatus());
    }
    clients.get(key).add(clientId);

    poolIndex++;
    if ( poolIndex % size == 0 ) {
      poolIndex = 0;
    }
    return cn;
  }

  /*
   * Grow the pool on demand by counting the number of clients per connection. If filled up a new IConnection is spwaned.
   */
  private static String autogrow() {
    boolean grow  = false;
    int growCount   = 0;

    Entry<String, List<String>> first = clients.entrySet().iterator().next();
    int lowestSize    = first.getValue().size();
    String lowestKey  = first.getKey();

    // count how many lists's size > MAX CLIENT, also get the lowest list size
    for ( Map.Entry<String, List<String>> entry : clients.entrySet()) {
      List<String> list = entry.getValue();

      if ( list.size() > maxClientsBeforeGrow) {
        growCount++;
      }
      if ( list.size() < lowestSize ) {
        lowestKey = entry.getKey();
        lowestSize = list.size();
      }
    }
    // if the # of lists's size > MAX CLIENT is >= client's size then grow pool
    if ( growCount >= clients.size()) {
      grow = true;
    }
    if ( grow ) {
      int idx = connections.size();
      try {
        initializeConnection(idx, true);
      } catch (Exception e) {
        e.printStackTrace();
      }
      // point to new index
      poolIndex = idx;
    }
    return lowestKey;
  }

  public static String dump() {
    StringBuffer buf = new StringBuffer();
    for ( Map.Entry<String, List<String>> entry : clients.entrySet()) {
      buf.append(entry.getKey() + " = " + entry.getValue() + " ");
    }
    return buf.toString();
  }

  /**
   * Invoke this to release the client count per connection & keep things clean.
   * @param clientId Id of the client to release.
   */
  public static void releaseClient( final String clientId) {
    // Loops thru all lists & remove id. Inefficient but should work
    for ( Map.Entry<String, List<String>> entry : clients.entrySet()) {
      List<String> list = entry.getValue();
      list.remove(clientId);
    }
  }

}
Listing 2: Connection pooling facade or entry point to all operations.
The life cycle of the ConnectionPool facade is simple:
Start: This method reads the initialization parameters: pool size, connection prefix, connection class name, auto-grow feature, and grow threshold and initializes the connections. The connection initialization code does the following:
Loads the class that implements IConnection using reflection.
Connects to the remote server optionally waiting for the connection to complete.
Destroy: This method disconnects all connections from the remote and clears the connection tracker hash-map.
getConnection: Invoke this method to obtain a connection by passing an id from the requesting client. This value is used to spread connection usage evenly among all members.
releaseClient: Invoke this method to release a client from the pool once the client disconnects from the remote. Failure to do this will confuse the load balancing logic.
The final step is to put the whole thing to the test. Let take a look.
Testing with Avaya AES
Listing 3 shows a simple program to test the connection pool mechanism using the Avaya AES JTAPI library available online at https://downloads.avaya.com/css/P8/documents/101029580. Note that for this to run you will have to download Avaya’s JTAPI client library from the link above and add it to your project.
As I mentioned before, our organization provides CTI (Computer Telephony Interface) web connectors to multiple call manager vendors. The example bellow connects to the Avaya AES call manager using the JTAPI standard and Avaya’s JTAPI implementation library. Connecting to a call manager is as simple as doing:
Where the string AVAYA#CM#CSTA#MBTAES;login=USER;passwd=XYZ;servers=1.2.3.4:PORT describes an Avaya call manager connection string with Tlink=AVAYA#CM#CSTA#MBTAES, user, password and remote server-port. Note that behind all that JTAPI clutter there is 1 client socket that communicates with the Avaya server using a binary protocol and Abstract Syntax Notation (ASN). There is plenty of documentation about this online and the link mentioned above.
package com.c1as.net;

import java.io.IOException;
import java.util.HashMap;
import java.util.Map;

import javax.telephony.CallEvent;
import javax.telephony.JtapiPeerFactory;
import javax.telephony.Provider;
import javax.telephony.ProviderEvent;

import com.avaya.jtapi.tsapi.adapters.CallListenerAdapter;
import com.avaya.jtapi.tsapi.adapters.ProviderListenerAdapter;

public class TestWithAvaya {

  // Avaya JTAPI Provider connection
  // See https://downloads.avaya.com/css/P8/documents/101029580
  public static class AvayaConnection implements IConnection {
    String user   = "ctiuser";
    String pwd    = "Secret";
    String server   = "192.168.123.345:450";       // T-Server address-port
    String tlink  = "AVAYA#CM#CSTA#MBTAES"; // TLINK
    String cn     = tlink + ";login=" + user + ";passwd=" + pwd + ";servers=" + server;
    Provider p1   = null;
    ConnectionStatus status = new ConnectionStatus(Status.IDLE, "");

    static void LOGD(String text) {
      System.out.println("[AVAYA-CN] " + text);
    }

    @Override
    public void connect(final boolean wait) throws IOException {
      try {
        LOGD("Connecting to " + cn);
        p1 = JtapiPeerFactory.getJtapiPeer(null).getProvider(cn);
        p1.addProviderListener(new ProviderListenerAdapter() {
          @Override
          public void providerInService(ProviderEvent event) {
            super.providerInService(event);
            LOGD("IN SERVICE " + event);
            status.setStatus(Status.CONNECTED, "Connected to " + cn);

            // Notify AvayaConnection is ok to proceed.
            if ( wait) {
              synchronized (AvayaConnection.this) {
                AvayaConnection.this.notify();
              }
            }
          }
          @Override
          public void providerShutdown(ProviderEvent event) {
            super.providerShutdown(event);
            LOGD("PROV SHUTDOWN");
            status.setStatus(Status.DISCONNECTED, "");
          }
        });

        // Wait for a connection?
        if ( wait) {
          synchronized (this) {
            wait();
          }
        }
      } catch (Exception e) {
        status.setStatus(Status.ERROR, e.getMessage());
        throw new IOException(e);
      }
    }

    @Override
    public void disconnect() throws IOException {
      LOGD("Disconnect.");
      if (p1 != null ) {
        p1.shutdown();
      }
    }

    @Override
    public ConnectionStatus getStatus() {
      return status;
    }

    public Provider getProvider() {
      return p1;
    }
    @Override
    public String toString() {
      return tlink + "@" + server + " " + status;
    }
  }

  public static void main(String[] args) {
    try {
      Map<String, String> options = new HashMap<String, String>();

      // initial pool size=3
      options.put(ConnectionPool.OPT_MIN_CONNECTIONS, "3");
      // IConnection class to load via reflection
      options.put(ConnectionPool.OPT_CN_CLASSNAME, "com.c1as.net.TestWithAvaya$AvayaConnection");
      // Pool grows when # clients/connection exceeds 3
      options.put(ConnectionPool.OPT_MAX_CLIENTS_BEFORE_GROW, "3");

      // start
      System.out.println("Start Avaya CN pool test.");
      long t0 = ConnectionPool.start(options);
      System.out.println("Started pool in " + t0 + "ms.");

      // shutdown
      t0 = ConnectionPool.destroy();
      System.out.println("Destroyed pool in " + t0 + " ms.");

      //re start
      t0 = ConnectionPool.restart(options);
      System.out.println("Restarted pool in " + t0 + " ms.");

      // connect 25 terminals 46000-46024
      int term = 46000;
      for (int i = term; i < term + 25; i++) {
        String sterm    = String.valueOf(i) ;
        AvayaConnection cn  = null;

        try {
          cn = (AvayaConnection)ConnectionPool.getConnection(sterm);

        } catch (Exception e) {
          System.out.println(sterm +  " GET CONNECTION: " + e.getMessage());
          continue;
        }

        if ( cn.getStatus().getStatus() != IConnection.Status.CONNECTED ) {
          System.out.println("Bad connection " + cn);
          continue;
        }

        cn.getProvider().getTerminal(sterm).addCallListener(new CallListenerAdapter(){
          @Override
          public void callActive(CallEvent event) {
            System.out.println("CALL active " + event);
          }
        });
        System.out.println("GET term " + i + " Pool " + ConnectionPool.dump());
      }

      // release terms
      for (int i = term; i < term + 25; i++) {
        String sterm = String.valueOf(i) ;
        ConnectionPool.releaseClient(sterm);
        System.out.println("RELEASE term " + i + " Pool " + ConnectionPool.dump());
      }

      // shutdown
      t0 = ConnectionPool.destroy();
      System.out.println("Destroyed pool in " + t0 + " ms.");
    } catch (Exception e) {
      e.printStackTrace();
    }
  }
}
Listing 3: testing the connection pool mechanism with Avaya AES.
The code in listing 3 spreads 25 terminals over a pool of 3 JTAPI connections to the Avaya call manager. Run the code above to visualize how the terminals are spread among the pool. Note that once all connections fill up with more than 3 clients, the pool facade will spawn a new connection and start spreading new connections evenly. In this case, you will need 25 Avaya terminals/phones to test so this may be difficult if you don’t have such a platform in your organization. Nevertheless, this mechanism is designed to work with any TCP socket based remote, so it should be easy to modify to satisfy your needs. All in all, this mechanism allowed our web-app to support unlimited client connections to all our call management vendors. It increased the overall I/O throughput of our product. Our web-app-call-manager connector with not crash and burn with 50+ agents but is now capable of handling 1000s only limited by the hardware as it should be.
I wrote this book to be the ultimate guide for programming a quantum computer in the cloud. Thanks to the good folks at IBM research this is now possible. IBM has made their prototype quantum rig (QExperience) available not only for research but for individuals in general interested in this field of computing.
Quantum computing is gaining traction and now is the time to learn to program these machines. In years to come, the first commercial quantum computers should be available and they promise significant computational speedups compared to classical computers. Consider the graph bellow showing the time complexities for two large integer factorization algorithms: the best classical algorithm, the number field sieve, vs. the quantum factorization algorithm developed by Peter Shor.
Shor’s algorithm provides a significant speedup over the number field sieve for a problem that is the foundation of current cryptography. A practical implementation of this algorithm will render current asymmetric encryption useless!
All in all, this book is a journey of understanding. If you find the concepts explained throughout the chapters difficult to grasp, then you are not alone. The great physicist Richard Feynman once said: If somebody tells you he understands quantum mechanics, it means he doesn’t understand quantum mechanics. Even the titans of this bizarre theory have struggled to understand what it all means. Ultimately, this is my take on quantum computing in the cloud and I hope you find as much enjoyment exploring it as I got writing it. My humble advice: Learn to program quantum computers, soon they will be ever present in the data center, doing everything form search and simulations to medicine and artificial intelligence. You name it.
The manuscript is divided in the following Chapters:
Chapter 1: The Bizarre and Awesome World of Quantum Mechanics
It all begun in the 1930s with Max Planck reluctant genius. He came up with a new interpretation for the energy distribution of the light spectrum. He started it all by unwillingly postulating that the energy of the photon was not described by a continuous function, as believed by classical physicists, but by tiny chucks he called quanta. He was about to start the greatest revolution in science in this century: quantum mechanics. This chapter is an appetizer to the main course, and explores the clash of two titans of physics: Albert Einstein and Niels Bohr. Quantum mechanics was a revolutionary theory in the 30s and most of the scientific establishment was reluctant to accept it; including the colossus of the century: Albert Einstein. Fresh from wining the Nobel Prize, Einstein never accepted the probabilistic nature of quantum mechanics. This caused a rift with its biggest champion: Niels Bohr. The two greats debated it out for decades and never resolved their differences. Ultimately, quantum mechanics has withstood 70 years of theoretical and experimental challenges, to emerge always triumphant. Read this chapter and explore the theory, experiments, and results; all under the cover of the incredible story of these two extraordinary individuals.
Chapter
2: Quantum Computing: Bending the Fabric of Reality Itself
In the 80s, another great physicist – Richard Feynman – proposes a quantum computer. That is, a computer that can take advantage of the principles of quantum mechanics to solve problems faster. The race is on to construct such a machine. This chapter explores, in general terms, the basic architecture of a quantum computer: Qubits, the basic blocks of quantum computation. They may not seem like much but they have almost magical properties: Superposition, believe or not, a qubit can be in two states at the same time: 0 and 1. This is concept hard to grasp at the macro scale where we live. Nevertheless, at the atomic scale, all bets are off. This fact has been proven experimentally for over 70 years. Thus superposition allows a quantum computer to outmuscle a classical computer by performing large amounts of computation with relative small numbers of qubits. Another mind bender is qubit entanglement: Something that, when explored, seems more like voodoo magic than a physical principle. Entangled qubits transfer states, when observed, faster than the speed of light across time or space! Wrap your head around that. All in all, this chapter explores all the physical components of a quantum computer: quantum gates, types of qubits such as super conducting loops, ion traps, topological braids, and more. Furthermore, the current efforts of all major technology players in the subject are described, as well as other types of quantum computation such as quantum annealing.
Chapter
3: Enter the IBM Q Experience: A One of a Kind Platform for Quantum Computing
in the Cloud
In this chapter you will get your feet wet with the IBM Q Experience. This is the first quantum computing platform in the cloud that provides real or simulated quantum devices for the rest of us. Traditionally, a real quantum device will be available only for research purposes. Not anymore, thanks to the folks at IBM which have been building this stuff for decades and graciously decided to open it up for public use. Learn how to create a quantum circuit using the visual Composer or write it down using the excellent Python SDK for the programmer within you. Then execute your circuit in the real thing, explore the results, and take the first step in your new career as a quantum programmer. IBM may have created the first quantum computing platform in the cloud, but its competitors are close behind. Expect to see new cloud platforms in the near future from other IT giants. Now is the time to learn.
Chapter
4: QISKit, Awesome SDK for Quantum Programming in Python
QISKit stands for Quantum Information Software Kit. It is a Python SDK to write quantum programs in the cloud or a local simulator. In this chapter you will learn how to setup the Python SDK in your PC. Next, you will learn how the quantum gates are described using linear algebra to gain a deeper understanding of what goes on behind the scenes. This is the appetizer to your first quantum program, a very simple thing to familiarize your with the syntax of the Python SDK. Finally you will run it in a real quantum device. Of course, quantum programs can also be created visually in the Composer. Gain a deeper understanding of quantum gates, the basic building blocks of a quantum program. All this and more is covered in this chapter.
Chapter
5: Start Your Engines: From Quantum Random Number Generators to Quantum
Teleportation
This chapter is a journey through three remarkable information processing capabilities of quantum systems. Quantum random number generation explores the nature of quantum mechanics as a source for true randomness. You will learn how this can be achieved using very simple logic gates and the Python SDK. Next, this chapter explores two related information processing protocols: Super Dense Coding and Quantum Teleportation. They have exuberant names and almost magical properties. Discover their secrets, write circuits for the Composer, execute remotely using Python, and finally interpret and verify their results.
Chapter 6: Fun with Quantum Games
In this chapter you will learn how to implement a basic game in a quantum computer. For this purpose we use the quintessential Quantum Battleship distributed with the QISKit Python tutorial. The first part looks at the mechanics of the game, yet we don’t stop there. The second part of this chapter takes things to the next level by giving it a major face lift. In this part you will put Quantum Battleship in the cloud by giving it: A browser based user interface, an Apache CGI interface to consume events and dispatch them to the quantum simulator, and more. Impress your friends and family by playing Quantum Battleship with your web browsers in the cloud.
Chapter
7: Game Theory: With Quantum Mechanics Odds are always in your Favor
This
is a weird one, even for quantum mechanics standards. This chapter explores two
game puzzles that sow the remarkable power of quantum algorithms over their
classical counterparts: The counterfeit coin puzzle and the Mermin-Peres Magic
Square. In the counterfeit coin puzzle, a quantum algorithm is used to reach
quartic speed up over the classical solution for finding a fake coin using
balance scale a limited number of times. The Mermin-Peres Magic Square is an
example of quantum pseudo-telepathy or the ability of players to almost read
each other’s minds achieving outcomes only possible if they communicate during
the game.
Multicast is an amazing technology available in virtually all networking hardware out there. Virtually all IP routers on the cloud or in your company intranet are capable of multicast out of the box! so why it is so cool? Because it allows computers to communicate with each other with little or no configuration whatsoever, a feature that gave rise to the phrase “ZeroConf”, perhaps you heard about it.
If you are a Mac or Apple product user, you probably have been using ZeroConf/multicast already: when you turn on your MacBook and plugin your printer to the network or any Apple media device, perhaps you noticed that your desktop, will find the printer or device magically so you can start using it without having to search or even worse configure IP addresses/ports or other kinds of confusing things. Thanks to the power of multicasting all this is possible:
Computers, and other devices: printers, audio, video devices can find each other in a local IP network. This is sometimes referred as auto discovery.
Devices can talk to each other via multicast, for example they can send/receive text or binary data, be that chat, audio or video. Possibilities are endless.
Multicast is efficient: It uses UDP datagrams to send bytes over IP networks. This gives superior performance over TCP. Although the caveat vs TCP is that data packets can be lost. TCP guarantees packets are received at the other end, Multicast does not.
Multicast can be used for application clustering, so all your apps can communicate without cumbersome configuration: Just startup all your apps and boom! They discover themselves and talk to each other: Ain’t that the coolest thing ever!
As a matter of fact, multicast is commonly used by video conferencing software, especially on the enterprise by all major IT vendors. In this article, I decided to share my humble experiences when working on a clustering system for my IT organization using multicast as well other standard technologies.
Multicast Clustering: A Hidden Jewel
So I found myself at work with the task of providing clustering functionality to all products within my organization. We looked at a lot of software out there, perhaps you find yourself in a similar situation:
Most server side apps suffer from a dearth of high availability and fault tolerance.
As user load on your product increases, it becomes critical that your app becomes fault tolerant: automatically restarts on crashes, it is able to handle ever increasing numbers of clients or users, it can talk to other apps/nodes in your network to share information.
It was a rough period trying to figure out the most efficient way to provide fault tolerance and clustering to our products, although there are many open source software in the wild to tackle the situation:
Hazelcast: It is an in-memory platform for clustering applications using a combination of TCP and multicast protocols.
In-memory object caches there are dime a dozen: GridGain (very similar to Hazelcast), memcached, redis, etc.
Distributed key-value stores such as etcd which is incidentally used in the mighty Kubernetes orchestration system and other distributed systems.
We used Hazelcast as our group is mainly Java based shop that needs to support both Windows and Linux. It seemed like the best choice at the time, but as the months dragged on, I found few things I didn’t like:
A beefy library at around 4MB it bloated the size of our app by 33%.
Hazelcast used a combination of Multicast and TCP sockets for service discovery and does require configuration.
Sluggish performance when connecting large numbers of nodes.
On the plus side Hazelcast packs:
A lot of distributed data structures: Maps, Lists, Queue, Executors, Locks, and more.
It is a ready to go tool which is great for small teams with limited resources.
As the time passed I grew dissatisfied with mysterious bugs with distributed data structures: maps missing values, connections problems due to configuration mishaps, and poor performance with multiple nodes. By that time I stumbled into the slick features of multicast sockets and thought they were the coolest thing I’ve seen for a long time:
A MulticastSocket is a DatagramSocket that allows computers to join groups and send packets of bytes via UDP to all members of such group.
A multicast group is a special purpose IP address in the range 224.0.0.0 to 239.255.255.255. These addresses can be used to broadcast data among members.
Most hardware routers support multicast. This means that they understand multicast groups and handle the message delivery to their respective members.
The only thing members need to agree is in the multicast group (address) and a port number, and they are ready to go.
So in listing 1, I present a general purpose multicast class (NetMulticater) capable of broadcasting 8KB packets over multicast group 224.1.2.3 port 6789. Let’s take a closer look.
package com.cloud.core.net;

import java.io.IOException;
import java.net.DatagramPacket;
import java.net.InetAddress;
import java.net.MulticastSocket;
import java.net.SocketException;
import java.nio.charset.Charset;
import java.util.Arrays;

import com.c1as.cloud.core.types.CoreTypes;

/**
 * A very simple multi-cast sender/receiver: IP Multicast is an extension to the standard IP network-level protocol. RFC 1112.
 * IP Multicasting as: "the transmission of an IP datagram to a ‘host group’, a set of zero or more hosts identified by a single IP
 * destination address. A multicast datagram is delivered to all members of its destination host group with the same ‘best-efforts’
 *
 * <ul>
 * <li>See https://docs.oracle.com/javase/7/docs/api/java/net/MulticastSocket.html
 * <li>https://www.csie.ntu.edu.tw/~course/u1580/Download/Multicast/howipmcworks.html
 * </ul>
 *
 *
 */
public class NetMulticaster {

    /** Default address */
    public static final String DEFAULT_ADDR = "224.1.2.3";

    /** Default port */
    public static final int     DEFAULT_PORT = 6789;

    /** Several standard settings for TTL are specified for the MBONE: 1 for local net, 15 for site, 63 for region and 127 for world. */
    public static final int     DEFAULT_TTL = 15;

    String  address     = DEFAULT_ADDR;
    int     port        = DEFAULT_PORT;

    // receive buffer size (8K). The send buffer size cannot exceed this value or extra data will be dropped!.
    int     bufferSize  = 8192;

    // The socket
    protected MulticastSocket   s;

    // Multi cast group
    protected InetAddress       group;

    // 1 thread to receive stuff.
    protected Thread            receiver;

    // Listener used to send messages.
    protected MessageListener   listener;

    public static interface MessageListener {
        void onMessage (byte[] bytes);
    }

    public NetMulticaster()  {
    }

    /**
     * Construct
     * @param address Multicast UDO address.
     * @param port Multicast port.
     */
    public NetMulticaster(String address, int port)  {
        this.address    = address;
        this.port       = port;
    }

    /**
     * Create a {@link MulticastSocket} with the default TTL (15).
     * @throws IOException On socket errors.
     */
    public void open () throws IOException {
        open(DEFAULT_TTL);
    }

    /**
     * Create a {@link MulticastSocket} with the given TTL.
     * @param TTL Time-to-live: Several standard settings for TTL are specified for the MBONE: 1 for local net, 15 for site, 63 for region and 127 for world.
     * @throws IOException On socket errors.
     */
    public void open (int TTL) throws IOException {
        s   = new MulticastSocket(port);
        // Several standard settings for TTL are specified for the MBONE: 1 for local net, 15 for site, 63 for region and 127 for world.
        s.setTimeToLive(TTL);
    }

    /**
     * Set the multicast arguments. See https://docs.oracle.com/javase/7/docs/api/java/net/MulticastSocket.html
     * @param address Multi-cast address. Default: 224.1.2.3
     * @param port Multi-cast port. Default: 6789
     * @param bufferSize Multi-cast receive buffer size. Default: 2048
     */
    public void configure (String address, int port , int bufferSize) {
        this.address    = address;
        this.port       = port;
        this.bufferSize = bufferSize;
    }

    /**
     * Set the multicast arguments. See https://docs.oracle.com/javase/7/docs/api/java/net/MulticastSocket.html
     * @param address Multi-cast address. Default: 224.1.2.3
     * @param port Multi-cast port. Default: 6789
     */
    public void configure (String address, int port ) {
        configure(address, port, DEFAULT_PORT);
    }

    public void setListener (MessageListener l) {
        listener = l;
    }

    /**
     * Join the multicast group given by the default address (224.1.2.3) and port (6789).
     * @throws IOException
     */
    public void joinGroup () throws IOException {
        group   = InetAddress.getByName(address);
        s.joinGroup(group);
    }

    public void shutdown () throws IOException {
        if ( s != null) {
            s.leaveGroup(group);
            s.close();
            s = null;
        }

        stopThread();
    }

    public boolean isClosed () {
        if ( s == null) {
            return true;
        }
        return s.isClosed();
    }

    private void stopThread() {
        if ( receiver == null ) {
            return;
        }
        try {
            receiver.interrupt();
            receiver.join(2000);
        } catch (InterruptedException e) {
        }
    }

    /**
     * Send a packet to the multicast group.
     * @param msg Message bytes.
     * @throws IOException On I/O errors.
     */
    public void send (final byte[] msg) throws IOException {
        // guard against someone trying to send when the socket has been shutdown (null)
        if ( s == null) {
            return;
        }
        DatagramPacket hi = new DatagramPacket(msg, msg.length, group, port);
        s.send(hi);
    }

    /**
     * Send a text message.
     * @param text Text to send.
     * @throws IOException On I/O errors.
     */
    public void send (final String text) throws IOException {
        byte[] bytes = text.getBytes(Charset.defaultCharset());
        // In UDP there is no reading in chunks . If the size of the message > receive buffer size
        // then data is dropped. See https://stackoverflow.com/questions/15446887/udp-read-data-from-the-queue-in-chunks
        if ( bytes.length > bufferSize) {
            throw new IOException("Send failure for [" + text.substring(0, 32) + " ...] (MAX BUFFER SIZE " + bufferSize + "/" + bytes.length + " EXCEEDED)");
        }
        send(bytes);
    }

    public void receive () {
        receiver = new Thread(new Runnable() {
            public void run() {
                while ( true) {
                    try {
                        read();
                    }
                    catch (SocketException so) {
                        // socket closed?
                    }
                    catch (IOException e) {
                        e.printStackTrace();
                    }
                    try {
                        Thread.sleep(500);
                    } catch (InterruptedException e) {
                        Thread.currentThread().interrupt();
                        break;
                    }
                }
            }
        }, "MULTICAST-RECEIVER-" + CoreTypes.NODE_NAME);
        receiver.start();
    }

    private void read () throws IOException {
        // get their responses!
        byte[] buf          = new byte[bufferSize];
        DatagramPacket recv = new DatagramPacket(buf, buf.length);

        // this blocks until data is received
        s.receive(recv);

        int len = recv.getLength();
        if ( listener != null) {
            listener.onMessage(Arrays.copyOf(buf, len));
        }
    }

    /**
     * Get the {@link MulticastSocket} time to live (TTL)
     * @return Default TTL.
     * @throws IOException On I/O errors.
     */
    public int getTimeToLive() throws IOException {
        return s != null ? s.getTimeToLive() : 0;
    }

}
Listing 1: A general purpose multicaster capable of sending 8KB of data over address 224.1.2.3 port 6789.
The Java language has built-in support for mulicasting by means of the class java.net.MulticastSocket, thus, to join a multicast group or address, we simply do:
InetAddress group = InetAddress.getByName("228.5.6.7");
int port = 6789;
MulticastSocket socket = new MulticastSocket(port);
socket.joinGroup(group);
By executing the lines above in all our apps we have effectively created a virtual group (or cluster) we can use to send all kinds of messages: text, binary, etc. The great thing about this is that the IP router hardware understands that the address-port combo 224.1.2.3/6789 is a special purpose multicast endpoint. Your apps need not worry about delivery or configuration. Let the router worry about that. Finally, to send/receive a message:
// send
String msg = “Howdy stranger”;
DatagramPacket hi = new DatagramPacket(msg.getBytes(), msg.length(), group, port);
socket.send(hi);

// receive
byte[] buf = new byte[1024];
DatagramPacket recv = new DatagramPacket(buf, buf.length);
socket.receive(recv);
Give the NetMulticater a test spin by using the test classes in listing 2.
// NetMulticaster - Sender: TestZeroSender.java
public class TestZeroSender {

    public static void main(String[] args) {
        try {
            Multicaster m = new Multicaster();
            m.joinGroup();
            m.send("Hello World");

            Thread.sleep(10000);
            System.out.println("Sender Shutdown.");
            m.shutdown();
        } catch (Exception e) {
            e.printStackTrace();
        }
    }
}
// NetMulticaster - Receiver: TestZeroReceiver.java
public class TestZeroReceiver {

    public static void main(String[] args) {
        try {
            Multicaster m = new Multicaster();
            m.setListener(new MessageListener() {

                @Override
                public void onMessage(byte[] bytes) {
                    String s = new String(bytes);
                    System.out.println("Receiver Got: " + s + "]");

                }
            });
            m.joinGroup();
            m.receive();

            Thread.sleep(10000);
            System.out.println("Receiver Shutdown.");
            m.shutdown();
        } catch (Exception e) {
            e.printStackTrace();
        }
    }
}
Listing 2: Sender-Receiver test classes for NetMulticaster.java.
Some Things are just too Good to be True
My excitement about using multicast for service discovery and distributed clustering crashed for a while when I dug into some the caveats of this great technology:
Multicast packets can only travel within the same subnet. For example, let’s say you have to IP networks at your organization: 192.168.x.x for computers in your lab and 10.0.x.x for regular employees. If you deploy your multicast capable app in both networks (One at the lab on host 192.168.0.1 and another at your office 10.0.2.1). The apps won’t be able to receive the packets. That’s because multicast traffic is restricted to the same subnet (192.168.x cannot talk to 10.0.x and vice versa). This is a built-in feature in the hardware for obvious reasons:
Multicast flooding: Imagine routers not dropping multicast traffic over different subnets, then malicious users could use it to flood your network and the whole web for that matter with spam thus creating a denial of service threat.
Routing loops and other sorts of router misconfiguration and-or poorly designed data senders-receivers can wreak havoc in your network.
I must admit that caveat 1 was a low blow in my effort to use multicast to implement a clustering solution for my organization. Nevertheless I still believed that it was the way to go, and a found a way out in the form of multicast tunneling.
Tunneling
Multicast Traffic over Separate Networks
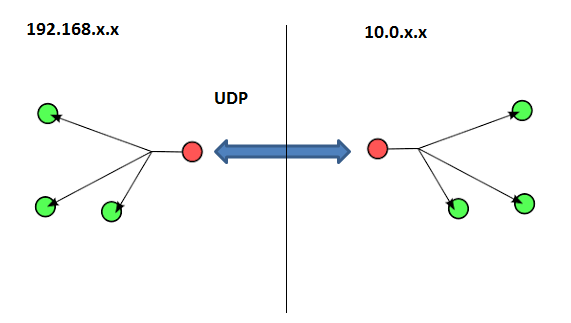
There is a technique that allows for multicast packets to hop over disparate networks bypassing the restrictions set the by the router hardware. It is called multicast tunneling and it works like this: Assume you have two or more separate networks (as shown in figure 1). By using a specialty software component called a multicast tunnel, the multicast packets can be transmitted by a virtual tunnel using standard UDP. Note that routers will allow standard UDP pass through to the other network. Once the multicast packet arrives at the other side of the tunnel, the receiver (specialty software) will relay the standard UDP packet via multicast to all members in the second network, and voila! We have transmitted a multicast packet across two different networks. Note that this requires the specialty software to be present in both sides of the tunnel.
Figure 1: Multicast tunneling using UDP.
There are several ways to accomplish multicast tunneling:
Via hardware by configuring network routers to tunnel the traffic. This is a difficult option as system administrators will be reluctant to do this due to the security threats inherent to multicasting. As a matter of fact, I tried to push for this in my organization in a desperate attempt to find a solution to my dilemma but was quickly shut down by management/system administration. This is probably a no go option.
Via multicast tunneling software. There is a lot of software out there to provide the tunneling capabilities we desire, however I found this to be difficult:
Most of the free software I found was Linux based, very difficult to install and even worse to configure. This will defeat the purpose of my goal of a clustering system with zero configuration. Not to mention that the software was Linux only (although there is probably a commercial Windows solution out there).
Having to deploy extra software make the whole thing to awkward, to develop, install and manage.
When tunneling software is not an option why not do it yourself? Looking at figure 1 it doesn’t seem too complicated, all we need is an extra UDP client-server on each side as a companion to the existing NetMulticater from listing 1.
Do-it Yourself Multicast Tunneling
The class in listing 2 is a little beefy but will get the job done. It basically does what figure 1 shows:
Thanks to the powerful TCP features of the Java language, MulticastTunnel packs simple UDPClient and UDPServer inner classes. These are used to relay the multicast packets from one endpoint of the tunnel to the other.
Both Multicast Sockets and UDP Sockets (known in Java as DatagramSocket) use DatagramPackets to send-receive data. This makes the relay process a breeze as the data is essentially the same. The only difference is the address and the way is sent through the network.
The class MulticastTunnel must run on both endpoints of the two networks. Each endpoint spawns a UDP Server to receive and a UDP client to relay the multicast packet.
MulticastTunnel uses NetMulticaster from listing 1 to join the local multicast group (address) in its local network, it then listens for multicast traffic, when a packet is received, the sender endpoint relays it using its local UDP client. In the other side (network), the local UDP Server receives the packet, and broadcasts to its local multicast network. The process works both ways.
public class MulticastTunnel {

    static void LOGE(String text) {
        System.err.println("[MCAST-TUNNEL] " + text);
    }

    static void LOGD(String text) {
        System.out.println("[MCAST-TUNNEL] " + text);
    }

    static final int DEFAULT_UDP_SERVER_PORT = 4445;

    // Used to receive from the remote endpoint
    private UDPServer server;

    // Used to send to the remote endpoint
    private UDPClient client;

    // Used to listen/bcast in the local subnet
    private NetMulticaster multicaster;

    // Used to prevent feedback loops
    private static final List<String> hashes = new CopyOnWriteArrayList<String>();

    // If true dump info to stdout
    private static boolean debug;

    // metric: total packets send/received
    private long packetsSent;

    // metric: total bytes sent/received
    private long bytesSent;

    // metric: uptime (ms)
    private long upTime;

    /**
     * The UDP server listens for packets in the local endpoint
     *
     * @author VSilva
     *
     */
    static class UDPServer extends Thread {
        private DatagramSocket socket;
        private boolean running;
        private byte[] buf              = new byte[8192];
        NetMulticaster multicaster;
        private long bytesRecv, packetsRecv;    // metrics

        public UDPServer(int port , NetMulticaster caster) throws IOException {
            super("MULTICAST-TUNNEL-" + CoreTypes.NODE_NAME);
            this.socket         = new DatagramSocket(port);
            this.multicaster    = caster;
            LOGD("Started UDP Server @ port " + port);
        }

        @Override
        public void run() {
            running = true;
            LOGD("Running UDP server @ " + socket.getLocalAddress() + ":" + socket.getLocalPort());

            while (running) {
                DatagramPacket packet = new DatagramPacket(buf, buf.length);
                try {
                    // this blocks execution until a packet is received...
                    socket.receive(packet);

                    final int len       = packet.getLength();
                    final byte[] data   = Arrays.copyOf(buf, len);
                    final String hash   = HASH(data);

                    // must be sorted. Else won't work!
                    final int idx       = Collections.binarySearch(hashes, hash);

                    if ( idx < 0 ) {
                        LOGD("UDP Server received " + len + "/" + buf.length + " bytes. Found: " + idx + " Multicasting");
                        multicaster.send(data);

                        // metrics
                        packetsRecv ++;
                        bytesRecv   += len;

                        addSortHashes(hash);
                    }
                    else {
                        LOGD("UDP Server received " + len + "/" + buf.length + " bytes. Hash: " + hash + " Packet already sent.");
                    }
                }
                catch (SocketException se ) {
                    // Swallow
                }
                catch (Exception e) {
                    e.printStackTrace();
                    LOGE("UDPServer:run(): " + e.toString());
                }
            }
        }

        public void shutdown () throws IOException {
            running = false;
            if ( socket != null) {
                socket.close();
            }
            packetsRecv = bytesRecv = 0;
        }
    }

    /**
     * Hashed packets must be sorted, else Collections.binarySearch won't work!
     * @param hash
     */
    private static void addSortHashes (final String hash) {
        hashes.add(hash);
        //Collections.sort(hashes); Cant sort CopyOnWriteArrayList - throws UnsuportedOperationException

        // How to sort CopyOnWriteArrayList
        // https://stackoverflow.com/questions/28805283/how-to-sort-copyonwritearraylist
        Object[] a = hashes.toArray();
        Arrays.sort(a);
        for (int i = 0; i < a.length; i++) {
            hashes.set(i, (String) a[i]);
        }
    }

    /**
     * The UDP client forward packets to the remote {@link UDPServer}.
     * @author VSilva
     *
     */
    static class UDPClient {
        private DatagramSocket socket;
        private InetAddress remoteHost;
        private int remotePort;

        public UDPClient(String remoteHost, int remotePort) throws SocketException, UnknownHostException {
            super();
            this.remoteHost = InetAddress.getByName(remoteHost);
            this.remotePort = remotePort;
            this.socket     = new DatagramSocket();
            LOGD("Started UDP Client to remote " + remoteHost + " @ " + remotePort);
        }

        public void send(byte[] buf) throws IOException {
            //LOGD("UDP Client: sending " + buf.length + " bytes to " + remoteHost + ":" + remotePort);
            DatagramPacket packet = new DatagramPacket(buf, buf.length, remoteHost, remotePort);
            socket.send(packet);
        }

        public void shutdown () {
            if ( socket != null) {
                socket.close();
            }
        }
    }

    public MulticastTunnel() throws IOException {
    }

    /**
     * Construct a multicast tunnel.
     * @param udpServerPort The port of the local {@link UDPServer}. Default: 9876
     * @param remoteHost IP address or host name of the remote endpoint {@link UDPServer}.
     * @param remotePort Port of the remote {@link UDPServer}. Default: 9876
     * @throws IOException on I/O/Socket errors.
     */
    public MulticastTunnel(int udpServerPort , String remoteHost, int remotePort) throws IOException {
        init(udpServerPort, remoteHost, remotePort);
    }

    private void init (int udpServerPort , String remoteHost, int remotePort ) throws IOException {
        // 224.1.2.3 : 6789
        this.multicaster    = new NetMulticaster();
        this.server         = new UDPServer(udpServerPort, multicaster);
        this.client         = new UDPClient(remoteHost, remotePort);

        this.multicaster.setListener(new NetMulticaster.MessageListener() {

            @Override
            public void onMessage(byte[] bytes) {
                final String hash       = HASH(bytes);

                // must e sorted. Else won't work!
                final int idx           = Collections.binarySearch(hashes, hash);

                //LOGD("Multicast: got " + bytes.length + " bytes. Hash:" + hash + " found:" + idx);
                try {
                    if ( idx < 0 ) {
                        LOGD("Multicast: Tunneling " + + bytes.length + " bytes.");
                        client.send(bytes);

                        // metrics
                        packetsSent ++;
                        bytesSent   += bytes.length;

                        addSortHashes(hash);
                    }
                    else {
                        //LOGD("Multicast: Packet " + hash + " already sent.");
                    }

                    if ( hashes.size() > 200) {
                        LOGD("Cleaning hash list.");
                        hashes.clear();
                    }
                } catch (IOException e) {
                    LOGE(e.toString());
                }
            }
        });
        this.multicaster.open();
        this.multicaster.joinGroup();
        this.multicaster.receive();
    }

    public void start () throws IOException {
        if ( server == null || client == null || multicaster == null) {
            throw new IOException("Invalid constructor invoked.");
        }
        upTime  = System.currentTimeMillis();
        server.start();
    }

    public void start (int udpServerPort , String remoteHost, int remotePort ) throws IOException {
        if (isRunning()) {
            return;
        }
        upTime  = System.currentTimeMillis();
        init(udpServerPort, remoteHost, remotePort);
        server.start();
    }

    public void shutdown () throws IOException {
        LOGD("Shutting down multicast tunnel.");
        upTime = packetsSent = bytesSent = 0;
        if ( server != null) {
            server.shutdown();
        }
        if ( client != null) {
            client.shutdown();
        }
        if ( multicaster != null ) {
            multicaster.shutdown();
        }
        server      = null;
        client      = null;
        multicaster = null;
    }

    public boolean isRunning () {
        return server != null && client != null && multicaster != null;
    }

    /**
     * MD5 digest tool. It should only be used to generate an instance ID. MD5 hashes are not secure.
     * @param string String to digest.
     * @return Hex encoded MD5.
     */
    static String HASH(final byte[] bytes) {
        try {
            java.security.MessageDigest md = java.security.MessageDigest.getInstance("SHA-256");
            byte[] digest = md.digest(bytes);

            StringBuffer sb = new StringBuffer();

            for (int i = 0; i < digest.length; ++i) {
                sb.append(Integer.toHexString((digest[i] & 0xFF) | 0x100).substring(1,3));
            }
            return sb.toString().toUpperCase();
        }
        catch (java.security.NoSuchAlgorithmException e) {
        }
        return null;
    }

    public static void setDebug (boolean debug) {
        MulticastTunnel.debug = debug;
    }

    public long getPacketsSent () {
        return packetsSent;
    }
    public long getBytesSent () {
        return bytesSent;
    }

    public long getPacketsRecv () {
        return server != null ? server.packetsRecv : 0;
    }

    public long getBytesRecv () {
        return server != null ? server.bytesRecv : 0;
    }

    public long getUptime () {
        return upTime;
    }

}
Listing 3 Multicast Tunneling using standard UDP client-server endpoints.
Multicast tunneling will allow you to send multicast traffic over separate networks, and you can test it using the test code in listing 3. The test procedure works in the following way:
Assuming two different networks in your organization: 192.168.x and 10.0.x. Pack NetMulticaster.java (listing 1), MulticastTunnel.java (listing 3), and TestMulticastTunnel.java (listing 4) in your project. Add a batch file to start the main method in TestMulticastTunnel with arguments given from the command line.
Deploy the project in two separate hosts in both networks. Let’s assume 192.168.1.2 and 10.0.0.1 with the command arguments:
TestMulticastTunnel 10.0.0.1 8000 true (node 1 on net 192.168)
TestMulticastTunnel 192.168.1.2 8000 true (node 2 on net 10.0)
The tunnel is now online on both networks over UDP port 8000. Finally use the NetMulticaster test code (TestZeroSender in listing 2) to send a multicast message in network 1 and look at the console of the MulticastTunnel endpoint in network 2 for a receipt. The packet will then be multicasted in network 2 (If you run TestZeroreceiver in network 2 the message will display at the console. Great success!)
public class TestMulticastTunnel {
  public static void main(String[] args) {
    try {
      if ( args.length < 2) {
        throw new Exception("USAGE: " + MulticastTunnel.class.getSimpleName() + " REMOTE_HOST REMOTE_PORT [DEGUG:{true/false}]");
      }
      String remoteHost   = args[0];
      int remotePort    = Integer.parseInt(args[1]);
      boolean debug       = args.length == 3 ? Boolean.parseBoolean(args[2]) : false;

      MulticastTunnel.setDebug(debug);
      MulticastTunnel tunnel = new MulticastTunnel(remotePort, remoteHost, remotePort);
      tunnel.start();

    } catch (Exception e) {
      e.printStackTrace();
    }
  }
}
Listing 4: Test class for MulticastTunnel.java
Caveats of Multicast Tunneling
The classes in listing 1 and 3 provided a simple solution to my goal of a zero configuration service discovery and clustering solution for my organization, but there were several caveats found along the way:
Feedback loops: If care is not taken with MulticastTunnel.java (listing 3), and endless loop can occur. If node 1 (network1) in the tunnel receives a multicast packet, sends it via UDP to node2 (network2). Node2 receives, then multicasts to its local network2. Trouble occurs when node2 receives the multicast packet it just sent (Because node2 is a member of the multicast network itself – it will receive the packet it sent). Big trouble occurs when node2 tries to relay that packet back to node1 thus creating and endless loop.
Loops may occur because all members of a multicast group will receive. So if you have 3 hosts in a group: host1, host2, host3, and host1 sends 1 packet then host1 will send it and receive it too. In an early interaction of my code in listing 3 I didn’t realize this, so when testing I saw 1 packet being sent to network2 then the same packet being sent back from network2 flooding the whole thing with and endless loop!
Loops can be avoided by hashing the multicast packets, saving the hashes in a sorted list after being sent, then whenever a new packet arrives, its hash is checked against the list, if a hash exists, then its been sent already so skip the send operation. This technique is shown in the following snippet (see listing 5) from MulticastTunnel.java.
this.multicaster.setListener(new NetMulticaster.MessageListener() {

  @Override
  public void onMessage(byte[] bytes) {
    // hash packet
    final String hash     = HASH(bytes);

    // search for it (if found idx > 0)
    final int idx       = Collections.binarySearch(hashes, hash);

    try {
      if ( idx < 0 ) {
        // send via UDP
        client.send(bytes);
        // save hash int sorted hashes list
        addSortHashes(hash);
      }
      else {
        //
      }
      // clean hash list
      if ( hashes.size() > 200) {
        hashes.clear();
      }
    } catch (IOException e) {
      LOGE(e.toString());
    }
  }
});
Listing 5: Avoid recursive feedback loops in MulticatTunnel.java.
Multicast tunneling provided a simple solution for a zero configuration app discovery and data clustering system in my organization. Although there are some security issues inherent to this technology (flooding, loops, angry sysadmins, increased network traffic), I believe the benefits outweigh the risks. I tested only with small text based JSON messages less than 8KB over a period of weeks with no issues in my network. Of course more testing is always required, large packets of binary data for example. All in all, the solution worked for me. I simply put some metrics in MulticastTunnel.java and was able to monitor the number of packets/bytes sent-received over the network for some extra peace of mind. I hope this simple code is useful for somebody out there running into the same problem. I believe Multicast is a hidden jewel that has not received the love from developers it deserves.

 68/100